Two-step verification and passkeys in ChatGPT
Two-step verification (called multi-factor authentication in ChatGPT's settings) means that a second proof is needed alongside the password: a six-digit code from an authenticator app, an approval on the phone or a passkey. Because of conversations, memory and uploaded files, a ChatGPT account holds a lot of personal data, so the few minutes it takes to turn it on are worth it. Since spring 2026, a stricter, optional mode is also available.
In this article
Which second step can be chosen?
- Authenticator app: for example a six-digit code from Google Authenticator, Microsoft Authenticator or a password manager that changes every 30 seconds. It works without an internet connection.
- Approval in the ChatGPT app: when a login is started on another device, a notification arrives on the phone, where the login can be approved or denied.
- Code by text or other message: available depending on the account and the country; because of SIM swap fraud, it is weaker than the other methods.
- Passkey: confirms the login with a fingerprint, face recognition, the device PIN or a hardware security key, and cannot be used on phishing sites.
- Advanced Account Security: passkeys or security keys only, without a password (see below).
Turning it on with an authenticator app
- Install an authenticator app on the phone if there is none yet.
- On chatgpt.com, click the profile icon in the bottom-left corner, then “Settings”, and choose the “Security” section.
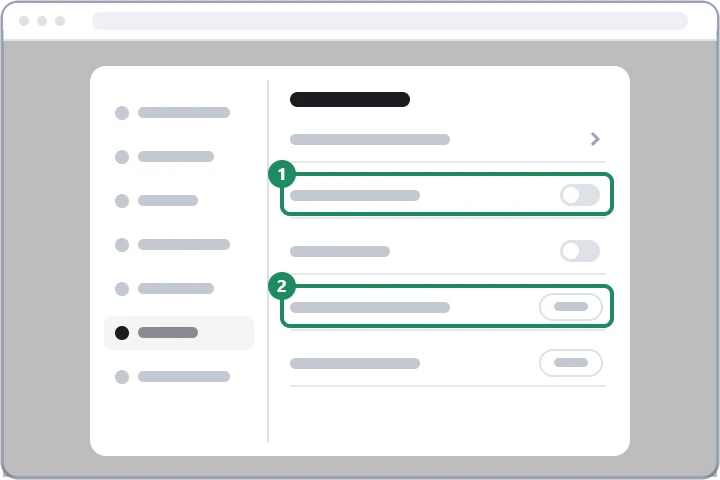
- Under multi-factor authentication, turn on the toggle in the authenticator app row (1). For sensitive changes, ChatGPT may first verify the owner with an email code or the password.
- In the authenticator app, add a new account and scan the QR code shown on the screen. If that does not work, the text key below the code can be typed in manually.
- Enter the six-digit code shown by the app in the ChatGPT window.
- ChatGPT then shows a recovery code. Copy it and keep it separate from the phone, for example in a password manager or printed out.
What the recovery code is for
The recovery code helps if the phone is lost or replaced, or the authenticator app has been deleted. At login it can be entered on the code page using the option that offers another method, and it works once: afterwards a new authenticator has to be set up, and a new recovery code is created. Anyone with neither an authenticator nor a recovery code can only get back into the account through OpenAI support, after a verification lasting several days. When switching to a new phone, it is therefore best to move the authenticator accounts while the old device is still available, or to link the app again in the settings.
Approving a login on the phone
If the owner is also logged in to the account in the ChatGPT phone app and this option is turned on, a notification arrives about a login started on another device. Approve it only if the owner really started the login; an unexpected request suggests someone knows the password, and in that case the password must be changed immediately. The notification requires an up-to-date version of the official app:
Adding a passkey
- Under “Settings” → “Security”, choose the add button at passkeys (2).
- The browser or the system offers where to store the passkey: on the phone, on the computer, in a password manager or on a USB or NFC security key.
- Confirm with a fingerprint, face recognition or the device PIN.
- At the next login, ChatGPT offers the passkey first; the password and other methods are available by choosing another method.
- Several passkeys can be added, for example one on the phone and one on the computer. The passkey of a lost device should be deleted in the same place.
Advanced Account Security (2026)
On April 30, 2026, OpenAI introduced the optional Advanced Account Security mode for ChatGPT and Codex accounts. It is meant for people at higher risk of targeted attacks, or who want the strongest possible protection; it can be turned on at chatgpt.com/advanced-account-security.
- Password login is removed; only a passkey or a FIDO security key can be used.
- Account recovery by email and text message is turned off. Access can only be regained with the backup passkey, security key or recovery key; support cannot help either.
- Sessions are shorter, a notification is sent for every login, and OpenAI does not use these accounts' conversations to train its models.
- Before turning it on, set up at least two keys or passkeys kept in separate places, and save the recovery key.
If it doesn't work
I log in with a Google or Apple account. Do I need separate two-step verification?
In that case Google or Apple handles the login, so two-step protection should primarily be turned on there. ChatGPT's own multi-factor authentication can be added on top, but while it is on, the login method cannot be changed.
How can multi-factor authentication be turned off?
In the same place, under “Settings” → “Security”, by turning off the toggle after entering a fresh code. Turn it off only for a good reason, for example to change the login method, and turn it back on afterwards.
The phone is lost, and the recovery code is missing too. What can be done?
If there is no passkey on another device either, ask OpenAI support for help in the chat window at help.openai.com. More about login problems: Common ChatGPT login problems and how to fix them.